TABLE OF CONTENTS
What are Opt-In Push Notifications?
Opt-in Push Notifications are notifications that you can send via email, text message and in-app to users who have subscribed to receive notifications from your Organization. They can be scheduled or sent instantly. Users can choose how they’d like to receive these notifications, and can subscribe (or unsubscribe) at any time. Push notifications can be added to every Driftscape plan. If you want to learn more, or to add them to your plan, contact your Driftscape support representative.
It’s easy for your visitors to subscribe to notifications from your organization.
Subscribers can opt to receive notifications by text message. Text messages can include a photo and will take users to the relevant POI if tapped.

Subscribers can opt to receive notifications by email with links to the relevant POI.

Subscribers can also opt to receive notifications from the Driftscape app [appearing in either the background or the foreground]. Fully customizable notifications can be scheduled to be delivered at a precise time, and can be created and sent in real-time. If the notification is received while the mobile app is open, it will appear within the app itself [ie in the foreground] instead of as a background notification.

Use Cases
Opt-in Push Notifications can be used to keep users both informed and up-to-date. Examples include:
Keeping your Organization top of mind, by letting your users know when you have news and keep them engaged on an ongoing basis.
For Events, use Push Notifications to keep your attendees informed throughout the day about important happenings and to provide directions.
For a municipality, keep residents informed of important updates and changes like road closures, meetings, deadlines, etc.
Getting Started: Creating Push Notifications
Step 1: Access the Driftscape CMS
Once you have added Push Notifications to your Driftscape plan, you will be able to create, publish and manage notifications using the Content Management System [CMS]. Log in at cms.driftscape.com using your Username/Password credentials. Note: Your login credentials were shared with you by your Driftscape representative. If you need help logging in, or resetting your credentials, contact your Driftscape rep.

Step 2: Access your Organization and its Channels
By default, you will land on the Organization Content screen…you want to instead access the Organization Properties screen by clicking on ORG PROPERTIES:

For the Organization you are working under, choose its associated icon under the Org Channels column:

Step 3: Create a Channel
For example, you might want a channel called ‘EVENT NEWS’ to send current updates and directions during an event.
Click on Add A Channel:
Enter a Channel Name; activate the ‘Is Enabled?’ circle; click ‘ADD’ to complete:
For subsequent changes to the channel you have created, click on the pencil icon under the Edit column:
Step 4: Create Notifications Within that Channel
You can now create notifications which will be sent to all the subscribers of your organization.
Back on the main Channels screen for your Organization, click on the icon under the Channel Notifications column for its associated Channel Name:
Click on ADD A CHANNEL NOTIFICATION:
Decide HOW you want to send your notification and check the appropriate activation circle (3 choices):
‘Publish immediately to all subscribers’: If checked, Add/Update will IMMEDIATELY send the notification to all users registered for the channel associated with this notification.
‘Send a test to one subscriber: enter email address of test recipient’: Enter an email address for one user who is subscribed to the channel associated with this notification. Add/Update will send the notification to THIS USER ONLY.
‘Schedule send: enter time and date to publish notification’: Enter the date and time when you would like the notification to be published in the format shown. Use GMT time. You can use this website to convert from your local time to GMT.
Note: Test all notifications by using the ‘Send a test to one subscriber’ option before sending to all subscribers, as shown below.
Create and Test Your Notification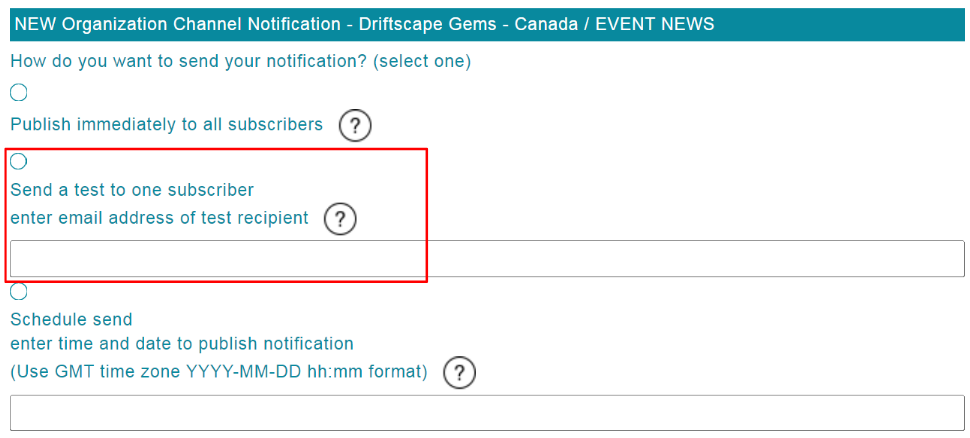
Fill in the Message Subject, Message HTML, Message Text, and Select an Associated Feature sections.

Message Subject: your message subject should be a short, one line description of the notification. This text will be used as the email subject, the title for background OS notifications, and will be displayed in the SMS text and in-app foreground dialogs.
Message HTML: This field is the body content that will be displayed in emails and in-app foreground notifications (but not text messages). Via the editing toolbar, this content can be formatted using the same formatting elements available for POIs including inline images, external links, and internal deeplinks.
Message Text: The Message text should contain the similar information as the Message HTML, but doesn’t support HTML elements. This field should contain a plain text version of the same content in the Message HTML. This content will appear in text messages, as well as in-app background notifications.
Associated POI: You may optionally select a POI from your organization to associate with the notification. This can be a regular POI or a tour stop. From the dropdown menu, choose which POI on the Driftscape app you would like to link to in your notification.
If you DO associate a POI with the notification, the associated notification action will be to open the POI in Driftscape. The notification action is included in all message types (emails, SMS text, in-app foreground notifications).
If you DO NOT associate a POI with the notification, then the notification action will be to open Driftscape, go to map mode, select your organization, and view all its content.
Scroll to the bottom of the screen and click on ADD:
The screenshots below demonstrate how the various types of Notifications are displayed to subscribers:

Send Your Notification
After you have tested your notification by sending it to one subscriber, and are happy with everything, you can choose one of the following options.
‘Publish immediately to all subscribers’: If checked, Add/Update will IMMEDIATELY send the notification to all users registered for the channel associated with this notification.

‘Schedule send: enter time and date to publish notification’: Enter the date and time when you would like the notification to be published in the format shown. Use GMT time. You can use this website to convert from your local time to GMT.

At the bottom of the screen, complete the process by clicking on UPDATE…this will send your Notification to all subscribers.
Cloning a Notification
Once the notification is sent to all subscribers it cannot be edited, but by selecting the icon under the Clone Notification column a new notification can be created starting from the same content as the existing notification. This can be used to create similar notifications to one you have already sent, or to send a notification a second time.
Promoting Users to Opt-in to your Notifications
You can use a custom deeplink to encourage your visitors to sign-up to your notifications:
subscribe_org[c]: similar to open_org in that it will open the organization details, this will also subscribe the user to that organization for push notifications, if supported for that organization. This action is not supported in Driftscape for Web.
You can use this in your social media posts and QR codes to encourage users to sign up to your organization’s notifications.
Was this article helpful?
That’s Great!
Thank you for your feedback
Sorry! We couldn't be helpful
Thank you for your feedback
Feedback sent
We appreciate your effort and will try to fix the article